Tuesday, April 30, 2013

Pictures from Mayday Underground!

Here are some pictures from Mayday Underground this past Saturday...


I was pretty busy most of the day (which is a good thing!) so I didn't have much time to take as many pictures as I would have liked.  You can go to the photo album on the Mayday Underground Facebook page to see photos of the other vendors. (a friend of mine took a bunch of photos of me & my booth, I'm just waiting for her to post them).  Check out the Mayday posts on the RNEST blog and the Jackbear Stamps blog as well.


(blurry selfie)


Mayday was the craft show debut of the Fox Nubbins and the Plaid-ypus Nubbins.  The foxes and barn owls were my best sellers of the day.


Before every show, I'm afraid I don't have enough product... then when I set up, I find I have too much to fit into the display!  My sweater monster trunk was PACKED!  I actually had to keep some monsters back behind the table until I sold some.


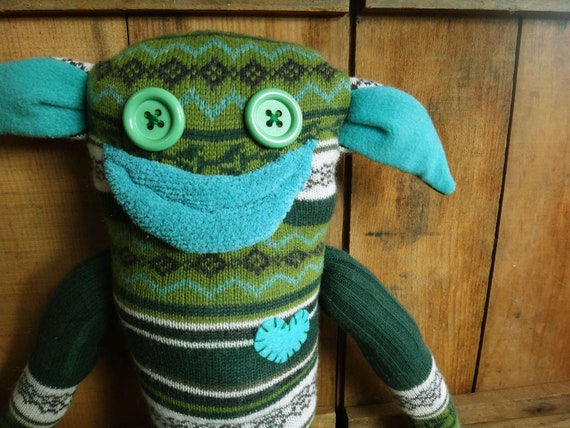
One of my biggest fans, Tree, bought one of my favorite recent monsters, Rigby.  I had to take a picture of him, since I never had the chance to before the show!

 And friends of mine, Holli and Ben, bought big Tobias, the super tall sweater monster who was over 2 foot tall.  He was my favorite monster I had at the show (you know, the one you secretly hope no one buys?).  It seems silly, but I'm glad he was bought by someone I know!

I made lots of sales, and I considered the day a great success!...as every Mayday Underground show is for me!  But it was exceptionally good for a spring craft show!  Thank you so much to everyone who came and everyone who bought something from me!  It couldn't have been a successful day without you!

Tuesday, April 23, 2013

MAYDAY!

The spring Mayday Underground Art & Craft Show is THIS Saturday!  My monsters are getting excited at the prospect of finding new homes!

I'm so bad about promoting my shows online the week before the show...because I am usually sewing like a mad woman trying to get ready and make sure I have enough. You know how people say "only x more shopping days until Christmas"?...well, there are only 4 more sewing days until Mayday Underground!

Will you be near Rochester, NY on Saturday? Do you like cool, unique, quality art & craft items? Come on down to the Village Gate on Goodman St to see me and all the other awesome artists who will be there! If you're one of the first 50 shoppers at 10am, you get a free swag bag! If you can't get there that early, they'll have a photo booth from 2pm-4pm!

RSVP to the Facebook Event!


Okay, I gotta go get back to sewing and stuffing monsters!

Sunday, April 14, 2013

Monsters Have Invaded My Couch!

A mountain of monsters is threatening to overrun my couch. 
They are awaiting their hand-sewn details (eyes, lips, & hearts). 


(please forgive the not-so-great-quality cell phone photo!)

I am in full pre-craft show production mode to make sure I have enough for Mayday Underground in 2 weeks (Saturday, April 27th).  My goal this week was to machine-sew at least 3 sweater monsters a day.  A few days I only got 2 done (due to those annoying little distractions like laundry, grocery shopping, and cooking dinner)... other days I got 5 done...so it evened out.  One day this week, my husband came home from work and said "Oh my! Monsters are invading our house!" LOL!

Between this pile and the pile of finished monsters that have settled into a chair in the other room, I have just under 50 sweater monsters (more than enough I think!).  This upcoming week, I am planning on focusing on making Nubbins during the day and then paring down this mountain and hand-sewing in the evening when I watch TV with my husband.  I've already reduced the mountain by 5 monsters this weekend.  I'll have to remember to take photos of them before the show!


I couldn't resist taking a picture of Hal amongst the unfinished monster pile and uploading it to Instagram with the caption, "They'll never find me here!"
(you can find pictures of Hal on Instagram by searching for the hashtag #adventuresoffhalthesweatermonster)

Thursday, April 4, 2013

Vote For Wellington in the RNEST Team Challenge for April!

It's time for the RNEST Team Challenge again!  And my Sweater Monster,"Wellington", is in the running!  


This month's theme is "Pantone Color Of The Year: Emerald".  Go to the RNEST blog and click your choice in the poll at the upper right of the blog! (as usual, there is no registration required!  Just click!)


(If you find yourself wishing to purchase him, he is available in my Etsy shop!)
Wellington - Upcycled Sweater Monster 

Wednesday, April 3, 2013

Dapper Dog

This dog is another part of the order requested by my friend Ann (who I made the fabric roses for).
The plaid material is from one of her late father's shirts.


I call him "Dapper Dog".
She originally wanted a sock dog style, but I wasn't sure how to pull that design off using shirt material instead of socks.  So I made this dog in the style of my Woodland Creature dolls... a bit anthropomorphic with button-jointed arms.


After working with knits like sweaters and socks for so long, working with a non-stretchy fabric like this woven cotton shirt fabric was a slight challenge, but I got through it!  
I liked making the cuff of the shirt into the dog's shirt collar.  I'm looking forward to making some more "Dapper Dogs".


Ann decided to do something cool with Dapper Dog in the style of "Flat Stanley"... taking pictures of him in various locations (like what I was doing with Hal for awhile last summer).  You can go "like" her Dapper Dog Facebook page to follow his adventures!


I made a smaller dog ("Dapper Puppy") first as a prototype, but had forgotten to take a picture until I met Ann to deliver her order.  Dapper Puppy will be going to her sister in Australia.

 These Nubbins were Easter presents for her 2 sons.


Vintage Japanese Silk Blouse into Fabric Roses

I had a unique project request recently from my new friend Ann.  

There is quite a story that is the background to this project.  (Ann tells it better than I do, but I'll try).  So...Ann's father passed away last February, just before Valentine's Day. That Valentine's Day, her mother received a delivery of flowers.  They thought at first that they were sympathy flowers, but when they read the card, they found out the bouquet turned out to be from Ann's father.  He had scheduled the Valentine's Day delivery before he died. *tear*

But the story doesn't end there.  Every holiday since, Ann's mother has received flower arrangements.  Saint Patrick's Day, Easter, her birthday, his birthday, Christmas, even a "just because" bouquet.  He had scheduled all of them in advance!  Aww! *more tears* What a husband!


So... here's where we come to the project Ann wanted me to do.  Her father brought this Japanese silk blouse home for her mother back when he was in the Navy in the 50's and was stationed in Japan .  It had sentimental value, but it was pretty tiny and no one in the family could wear it anymore. So Ann wanted me to take this blouse and make five fabric flowers (one for her, her mother, for her 2 sisters, and her aunt).


I was SO nervous to cut into this VINTAGE blouse that had such sentimental value.  And I hadn't done much with silk before. Most of the flowers I have made before involve singing the edges of polyester fabric.  That technique wouldn't work here, since silk would just burn if I tried to singe it!   But Ann had such confidence in me.  She told me that I was the only one she'd trust with this project (no pressure, right? I found it confidence-boosting and nerve-wracking at the same time!)

When I finally mustered up the confidence and courage to cut into the blouse, I cut 5 strips and sewed each of them into a tube with a tapered end.

(A look at some detail of the fabric)

 Then, I did a straight stitch down the middle of the tube.


 After stitching down the middle, I pulled the top thread and scrunched and gathered the fabric for get it to ruffle a bit.


I folded the fabric on the gathered seam, stitched it again with an overlock stitch, and then rolled it up into a rose shape.

Then I put plenty of hot glue on the back to hold it into place.
After that, I took a circle of green felt, stitched around the edge, gathered it into a ball, stuffed it, and hot glued it onto the bottom of the flower.  Sorry I don't have photos of that process or my process of making the stems.(maybe I'll do a full tutorial at another time).  I made the stems with felt and wire.

I was able to get these finished and delivered in time for Ann to give them to her mother (and sisters and aunt) for Easter.  So Ann's mother still got her flower for Easter...and this was the first holiday a flower arrangement wasn't delivered. So bittersweet.